

solidworks - using derived sketch
Derived sketch is one of a good feature that often overlooked. This tool derives a sketch from another sketch that belongs to the same part, or derives a sketch from another sketch in the same assembly! When you derive a sketch from an existing sketch, you are assured that the two sketches will retain the characteristics that they share in common. Every changes that you make to the original sketch are reflected in the derived sketch. Here I will show how to derive a sketch from a sketch in the same part:
1. Select the sketch from which you want to derive a new sketch. Hold the Ctrl key and click the face or plane on which you want to place the new sketch. In the example below, it's an Offset Reference Plane by holding the CTRL key and dragging one of my planes away.

2. Then I chose Insert, Derived Sketch from the pull-down menu. This is one of those secret handshakes in SolidWorks where you have to pre-select to get the command to appear. (It is a species nearing extinction, now that “Convert Entities” now has a property manager interface in SolidWorks 2010.

3. Now that you have initiated the secret handshake, the sketch appears on the plane of the selected face, and the status line indicates that you are editing the sketch.
4. Position the derived sketch by dragging and dimensioning it to the selected face. (The derived sketch is rigid and drags as a whole entity.) I rotated my sketch 90 degrees about the midpoint of the first sketch. You can add relations to the original sketch so that things are coincident, parallel, ect…
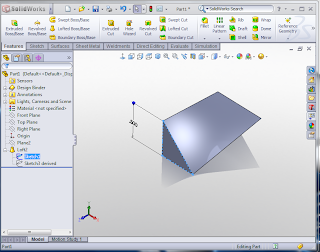
5. Then exit the Sketch. Make a feature like normal. In my example I created a lofted feature. Now if you change anything in the original sketch, the other sketch updates.
If you wish to “un-derive” the sketch so that it no longer receives the updates of the original, simply right-click the derived sketch feature in the tree and choose Un-Derive.
Sometimes small and overlooked features may come in handy, so it'd better to be prepared.
1. Select the sketch from which you want to derive a new sketch. Hold the Ctrl key and click the face or plane on which you want to place the new sketch. In the example below, it's an Offset Reference Plane by holding the CTRL key and dragging one of my planes away.

2. Then I chose Insert, Derived Sketch from the pull-down menu. This is one of those secret handshakes in SolidWorks where you have to pre-select to get the command to appear. (It is a species nearing extinction, now that “Convert Entities” now has a property manager interface in SolidWorks 2010.

3. Now that you have initiated the secret handshake, the sketch appears on the plane of the selected face, and the status line indicates that you are editing the sketch.
4. Position the derived sketch by dragging and dimensioning it to the selected face. (The derived sketch is rigid and drags as a whole entity.) I rotated my sketch 90 degrees about the midpoint of the first sketch. You can add relations to the original sketch so that things are coincident, parallel, ect…
5. Then exit the Sketch. Make a feature like normal. In my example I created a lofted feature. Now if you change anything in the original sketch, the other sketch updates.

If you wish to “un-derive” the sketch so that it no longer receives the updates of the original, simply right-click the derived sketch feature in the tree and choose Un-Derive.
Sometimes small and overlooked features may come in handy, so it'd better to be prepared.
Written by Admin
ChromeGT is a modern, powerful and professional Blogger template made for your Portfolio, Business or almost any other kind of website.

How to get solidworks for my home computer.?
ReplyDeleteSolidworks Support